on
Targeting 25 years of Windows with Visual Studio 2019
Our method to build software compatible down to Windows 2000 using Visual Studio 2017 served us well for several months. And trust me, I had really hoped that Windows 2000 would be as low as we ever had to go.
But the world of industrial manufacturing surprises you every day. So at some point, we inevitably stumbled upon industrial control systems that were still running Windows NT 4.0 from 1996. And they needed our software.
Before you want to close the tab now, because you think that this is just an ordinary sequel to my previous blog post, be assured: It’s not. We’re going to use a wholly different approach to build software that also runs on Windows NT 4.0, without any compromises. And we’ll end up with what’s probably the most modern way to compile C++ code in Visual Studio.
The naive first try
It all begins with my naive attempt to port the v141_xp toolset of Visual Studio 2017 down to Windows NT 4.0. After my successful attempt to get it Windows 2000-compatible, what should possibly go wrong?
I opened a test application (using std::mutex and std::thread) in Dependency Walker on Windows NT 4.0 SP6.
The test application was already made Windows 2000-compatible using the previous approach.
Dependency Walker yielded the following missing APIs from Windows NT’s KERNEL32.DLL:
ChangeTimerQueueTimerCreateTimerQueueCreateTimerQueueTimerDeleteTimerQueueTimerInitializeCriticalSectionAndSpinCountRegisterWaitForSingleObjectSetFilePointerExUnregisterWaitUnregisterWaitEx
Two of them are dead simple: InitializeCriticalSectionAndSpinCount is just an optimization of InitializeCriticalSection, which has been with us since the very first release of Windows NT.
A compatible implementation can just call InitializeCriticalSection and be done with it.
SetFilePointerEx is even better in that it can be implemented in its entirety around the SetFilePointer API.
Where SetFilePointerEx takes a 64-bit offset to move the file pointer and outputs the 64-bit absolute position after moving, SetFilePointer splits up each value into a low 32-bit part and a high 32-bit part.
This can only be understood through the lens of history:
C/C++ compilers did not always support 64-bit math natively, and so this workaround had to be used to accept 64-bit values anyway.
Taking the different return values into account, our compatible implementation of SetFilePointerEx looks like this:
static BOOL WINAPI
_CompatSetFilePointerEx(HANDLE hFile, LARGE_INTEGER liDistanceToMove, PLARGE_INTEGER lpNewFilePointer, DWORD dwMoveMethod)
{
    // This function can be implemented in its entirety using SetFilePointer.
    liDistanceToMove.LowPart = SetFilePointer(hFile, liDistanceToMove.LowPart, &liDistanceToMove.HighPart, dwMoveMethod);
    if (liDistanceToMove.LowPart == INVALID_SET_FILE_POINTER)
    {
        return FALSE;
    }

    if (lpNewFilePointer)
    {
        lpNewFilePointer->QuadPart = liDistanceToMove.QuadPart;
    }

    return TRUE;
}
The remaining APIs are not so easy though. They belong to the set of Timer Queue APIs, which were introduced in Windows 2000 and are rooted deeper in the OS. As always, the ReactOS source code comes handy to find out how complex they really are: reactos/sdk/lib/rtl/timerqueue.c
But wait a minute, why are these APIs actually needed in the first place?
The most sophisticated thing my test application does is spawning threads and locking mutexes.
None of these are recurring tasks and I’m also not doing any other timer-related operations.
So what is actually calling CreateTimerQueue?
Is it maybe just an unused dependency that isn’t optimized out during build?
What is Visual Studio doing here?
I decided to find out and implement simple stubs for all missing Timer Queue APIs in EnlyzeWinCompatLib. These stubs would just show a Message Box when being called, thereby giving me plenty of time to attach a debugger and examine the callstack.
It didn’t take long for the first surprise:
CreateTimerQueueTimer is actually called from the Concurrency::details::LockQueueNode constructor in crt\src\concrt\rtlocks.cpp, and that call originates from my std::mutex::lock() call.
Yes, you read that right: Locking a simple mutex initializes a framework for periodic timers in the C++ Runtime of Visual Studio 2017.
I could understand if std::mutex::lock() had to wait on a one-off event object in case the mutex was already locked, but the Timer Queue APIs are clearly designed for something else.
The surprises didn’t stop at this point. I let the program run, ignoring Timer Queues for now, and it eventually crashed at another location. Bringing in the debugger to the rescue again, the callstack had now blown up to this:
My program                           std::mutex::lock
crt\src\stl\mutex.c               -> _Mtx_lock
crt\src\stl\mutex.c               -> mtx_do_lock
crt\src\concrt\rtlocks.cpp        -> Concurrency::critical_section::lock
crt\src\concrt\rtlocks.cpp        -> Concurrency::details::LockQueueNode::LockQueueNode
crt\src\concrt\SchedulerBase.cpp  -> Concurrency::details::SchedulerBase::CreateContextFromDefaultScheduler
crt\src\concrt\SchedulerBase.cpp  -> Concurrency::details::SchedulerBase::GetDefaultScheduler
crt\src\concrt\SchedulerBase.cpp  -> Concurrency::details::SchedulerBase::CreateWithoutInitializing
crt\src\concrt\SchedulerBase.cpp  -> Concurrency::details::SchedulerBase::CheckStaticConstruction
crt\src\concrt\SchedulerBase.cpp  -> Concurrency::details::SchedulerBase::StaticConstruction
crt\src\concrt\Trace.cpp          -> Concurrency::details::_RegisterConcRTEventTracing
crt\src\concrt\Trace.cpp          -> Concurrency::details::Etw::RegisterGuids
Phew, that’s a lot of calls for something that should ideally just be a single LOCK CMPXCHG processor instruction and some support code to try again if the mutex is already locked.
In fact, that code hasn’t even checked the mutex lock state at this point.
But why does it crash here? Let’s have a look at the code in question:
if (m_pfnRegisterTraceGuidsW != EncodePointer(NULL))
{
    FnRegisterTraceGuidsW* pfnRegisterTraceGuidsW = (FnRegisterTraceGuidsW*) Security::DecodePointer(m_pfnRegisterTraceGuidsW);
    return pfnRegisterTraceGuidsW(controlCallBack, NULL, providerGuid, guidCount, eventGuidRegistration, NULL, NULL, providerHandle);
}
Looks legit at first.
The code checks if that particular Event Tracing API is supported by the operating system and only calls it in this case.
The m_pfnRegisterTraceGuidsW function pointer has been initialized a few lines before:
m_pfnRegisterTraceGuidsW = (FnRegisterTraceGuidsW*) Security::EncodePointer(GetProcAddress(hTraceapi, "RegisterTraceGuidsW"));To guard against exploits, the pointers are encoded to make their values unpredictable.
The EncodePointer Windows API was already briefly covered in my previous post.
For whatever reason, Visual Studio’s C++ Runtime isn’t using that API directly, but brews its own magic cookie value in crt\src\concrt\utils.cpp.
Which is then accessed by the similarly named Security::DecodePointer and Security::EncodePointer functions.
Easy to mix up, isn’t it?
Well, turns out, it indeed is.
If you have been following the code with eagle eyes so far, you will have noticed that m_pfnRegisterTraceGuidsW is initialized using Security::EncodePointer, but checked for NULL using the totally different EncodePointer API.
The intention is clear, but the result is that the m_pfnRegisterTraceGuidsW NULL check is broken.
m_pfnRegisterTraceGuidsW is always called, no matter if it exists or not, and this code crashes under Windows NT 4.0.
I have reported this bug to the Visual Studio team along with the one-liner fix, and 6 months later the fix was even available in Visual Studio 2019 16.10 (albeit only for the newer toolset, v141_xp was not fixed).
But at that point, I had already given up on the C++ Runtime shipped with Visual Studio. With Timer Queues and Event Tracing, it did so much more than I asked for when I just wanted to lock a plain and dumb mutex. The added complexity inevitably led to bugs, and these bugs were not fixable by myself. With no official way to modify and recompile Visual Studio’s C++ Runtime, I began to look for other options. And I found one…
A new C++ standard library to the rescue
With C++ being shepherded by an ISO standardization committee, there has always been more than one implementation of the resulting C++ standard library. We’re going to have a look at the open-source options. They each have their own strengths and weaknesses:
The GNU C++ Library (also called libstdc++) is certainly the most popular open-source C++ library, considering that it’s used by the equally popular GNU G++ compiler and ships with every Linux distribution. However, this close connection to G++ is also its primary weakness for our case: The support for other compilers is minimal. Clang may work, but Visual Studio is clearly off the table.
Apache, the other conglomerate in the world of open-source, also has a C++ library project called STDCXX. It even comes with support for many platforms and compilers, Visual Studio is among them. However, there is a big downside: The project’s last release is from 2008 and the project has been officially retired in 2014. This predates any modern C++ developments.
STLport was one of the first standards-compliant C++ libraries. Before its inception, many C++ compilers shipped their own C++ libraries incompatible to each other, partly leading to the bad reputation of C++ in the 1990s. The project gained traction as notable vendors (like Borland and Sun) were replacing their incompatible libraries by STLport, which always put an emphasis on compiler and platform independence. This independence is also proven through projects like ReactOS, which has been using STLport for its Visual Studio builds of C++ code.
But, like Apache STDCXX, its age is a problem again: STLport has also seen its last release in 2008 and offers no C++11 support, let alone newer developments.Finally, the latest contender on stage is libc++ by the LLVM Project. It was started in 2009 to provide a permissely licensed alternative to the GNU C++ Library, at a time when that was the only maintained standard library left. As a second goal, it aims to embrace C++11 and later modern C++ standards right from the start. Not being bound to a single compiler by design, it looks like a perfect open-source replacement for the Visual Studio C++ standard library.
Let’s check how libc++ implements the std::mutex part in question.
Is it really leaner than the Visual Studio implementation?
Yes, it is: The libc++ std::mutex::lock() does a single function call, which itself calls just a single Windows API.
No weird side-effects are happening here.
However, the journey isn’t over at this point.
Although libc++ claims to be compiler and platform agnostic, it makes heavy use of the nonstandard preprocessor instruction #include_next.
This sophisticated hack is used to implement the subtle differences between modern C and C++ standards.
For example, in C99, the widely known math.h header defines a sqrtf function for the square-root of a float and a sqrtl function for the square-root of a long double.
C++ leverages its support for overloaded functions and templates to add a single function called sqrt for any numeric input, on top of the C99 functions.
libc++ implements that by providing its own math.h header, which first includes the C99 math.h provided by the C Runtime, and then adds sqrt and friends on top of that.
Now how can a system header called math.h include another system header under the same name?
This is where #include_next comes into play:
In order to not include the same file again, it starts searching the list of system header directories at the current file’s path and chooses the next file in order.
GCC had originally come up with #include_next, and LLVM’s Clang compiler followed, which is probably the reason why the libc++ folks considered #include_next to be “standard enough” to use it.
But Visual Studio’s C++ compiler is still out of the game.
Although there have been some efforts to provide an alternative to #include_next for compiling libc++ in Visual Studio, these efforts seem to have stranded.
There is also no hope that #include_next appears in Visual Studio anytime soon.
So close and yet so far away from a lean C++ library? Not quite. I decided to turn our entire build environment upside down and go a step further than just replacing the C++ library…
Moving to the future …
I was still on Visual Studio 2017 at this point, but decided to upgrade to Visual Studio 2019 anyway for the improved HiDPI support of the IDE. Playing around with it a bit, I found an even more interesting feature:
Visual Studio 2019 ships with the LLVM Project’s Clang compiler, and provides out-of-the-box support for it in the IDE!
Clang is a compiler project that was started by Apple in 2007 to build a C/C++ compiler upon the powerful LLVM compiler infrastructure.
Unlike GCC/Mingw-w64, which never gained serious foothold in the world of commercial Windows application development, Clang has embraced Windows pretty early in its development.
It comes with a clang-cl.exe binary that serves as a drop-in replacement for Visual Studio’s cl.exe compiler and accepts the same command-line parameters.
It even goes as far as defining _MSC_VER, the single constant used to detect the Visual Studio compiler version.
It outputs the same PDB debug symbol format to let all Windows debuggers step through a Clang-compiled application comfortably.
From the alternative compilers, it comes closest to supporting all Microsoft extensions to the C++ standard that Windows developers are used to (mostly without even knowing).
Finally, Clang is proven in the field, with major commercial Windows applications like Chrome and Firefox being built with Clang exclusively on Windows now.
Seeing Clang natively integrated into Visual Studio is just the logical next step for the Microsoft of Satya Nadella.
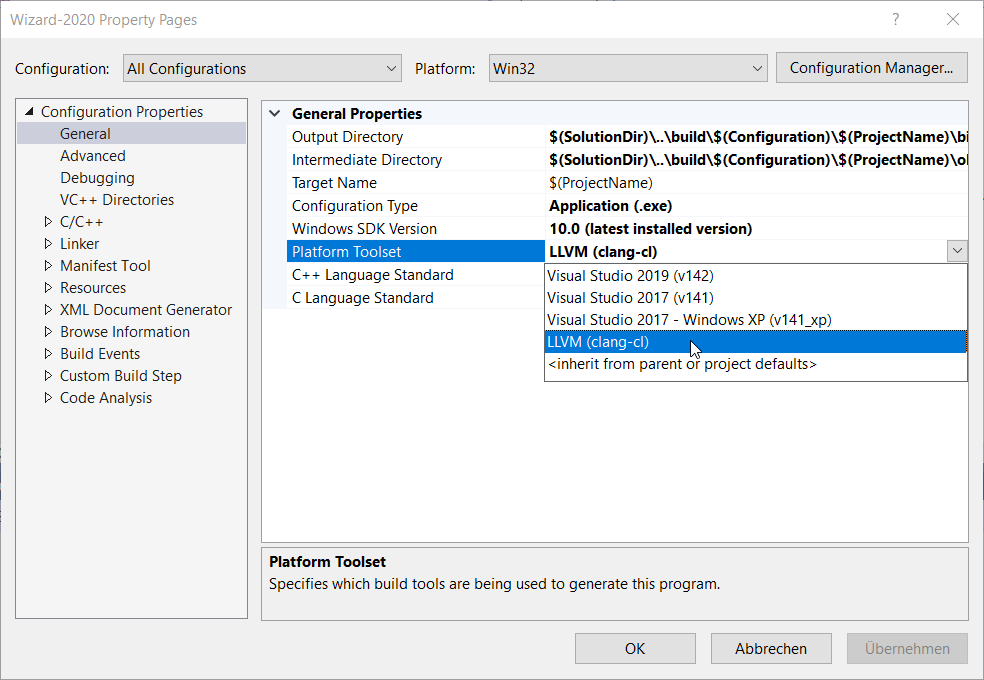
Creating a new Visual Studio project with Clang is just like creating any other Visual Studio C++ project. Just open Project Properties afterwards and select LLVM (clang-cl) as the Platform Toolset. Apart from the modern compiler, this comes with a few other amenities:
Windows SDK 10.0 is supported. Whereas the v141_xp toolset was forever limited to the old SDK version 7.1, the Clang toolset can take advantage of any new Windows features if required. This SDK version also still defines Windows version constants down to
_WIN32_WINNT_NT4, hence there shouldn’t be any downsides from using the latest SDK to develop software for very old Windows versions.The VC++ Directories part of the Project Properties dialog has a new category Public Project Content. This allows a library to define its include directories, so that they are automatically added to the include path of any executable importing this library. Include directories aren’t transitive though: The executable won’t get the include directories from dependencies of dependencies. All of this is nothing new for build systems like CMake, but it hasn’t been supported in the Visual Studio IDE with the previous v141_xp toolset.
The best of all: This solution is officially supported by the latest Visual Studio version, and there is no reason why support should cease anytime soon. Whereas the v141_xp toolset has not been updated anymore since Visual Studio 2017 (and it is doubtful whether it will still ship with Visual Studio 2021), the LLVM (clang-cl) toolset is here to stay.
A project for libc++
With all tools in place, I could now move on to import the include and src directories of the libc++ tree and turn them into a regular Visual Studio library project.
It was mostly as simple as creating a new project, selecting the LLVM (clang-cl) toolset, and adding all .cpp files from src and src\support\win32 to the project.
$(ProjectDir)\..\include was added as an additional include directory in the Project Properties.
From watching the official libc++ CMake build process, I could see that the _LIBCPP_BUILDING_LIBRARY preprocessor constant was added globally to let libc++ know that it’s being built as a static library.
So I did the same in the Preprocessor Definitions field of C/C++ → Preprocessor.
It also prepended a few lines to include\__config, which I now hardcoded into that file:
#ifndef _LIBCPP_CONFIG_SITE
#define _LIBCPP_CONFIG_SITE

#define _LIBCPP_DISABLE_VISIBILITY_ANNOTATIONS

#endif
That’s it!
With just these few steps, a static libc++ can be built entirely as a Visual Studio project in the IDE, without any CMake involved.
A small patch from me even allows to build it completely warning-free at /W4 level.
There are a few important caveats though when using that library together with an executable project in a Visual Studio solution:
You have to add it as a dependency via a right-click to References → Add Reference.
Even then, the comfortable Public Project Content category of VC++ Directories in the Project Properties dialog does not work well together with the parts of libc++ that use
#include_next. I wanted to use it to add the libc++includedirectory to Public Include Directories of the libc++ project and have every executable referencing it use the libc++ headers automatically. Sadly, this broke in many weird ways, and I had to resort to add the libc++includedirectory via C/C++ → General → Additional Include Directories of the executable. I believe this to be a bug, and have opened bug reports at LLVM and Microsoft a while ago, with no resolution yet though.Take extra care of the Enable Enhanced Instruction Set option in C/C++ → Code Generation. This may be set to Streaming SIMD Extensions (/arch:SSE) when you’re coming from a Visual Studio project that you’re moving to Clang. Which is fine for Clang if the SSE requirement is also fine for you.
People like me, who need to build software for prehistoric computers, are inclined to set this to No Enhanced Instructions (/arch:IA32) though, in order to support non-SSE processors (older than 1999’s Intel Pentium III or 2001’s AMD Athlon XP). However, Clang takes this option very seriously and disables support for every instruction that came after 1985’s Intel i386. This notably includes the entire family of atomic instructions, likeCMPXCHGorXADD, which are often used and taken for granted in today’s multithreaded code. If you get an error message likeundefined symbol: ___atomic_fetch_add_8fromlld-link, this is exactly what I’m referring to.
Fortunately, the solution is equally simple: Apart from Visual Studio’s command-line options, theclang-cl.execompiler also supports some of GCC’s command-line parameters, and this includes the fine-granular specification of the minimum CPU via-march. Add-march=pentium-mmxto Additional Options in C/C++ → Command Line and your binary will work fine down to processors from 1997.
When you have considered all this, building with Clang and libc++ is a breeze.
And if you care about the size of the resulting release binary, Clang’s optional -flto option comes handy, performing optimizations at link-time and squeezing out the last unused code from your executable file.
… and back to the past
We are now building our software using an open-source compiler and an open-source C++ standard library, right from the Visual Studio IDE. The only proprietary component left in our binary is the statically linked Visual Studio C runtime library. But as it is not causing any trouble and works fine for us on old Windows versions, we leave it unchanged.
However, keep in mind that open-source does not equal to “everything works out of the box”. Especially not in our case where we are targeting operating systems that all modern development tools have given up on. LLVM is no different here and has officially dropped Windows XP support with release 3.8 in 2017.
We notice that when trying to use std::mutex again.
The internal __libcpp_mutex_lock function called by std::mutex::lock() uses the Windows Vista+ API AcquireSRWLockExclusive.
__libcpp_mutex_trylock even uses TryAcquireSRWLockExclusive, which was only introduced in Windows 7.
Same goes for other functions dealing with concurrency.
A quick look into Git history confirms that they have only ever been implemented for Windows 7 or later.
The open-source nature of libc++ would allow us to reimplement the parts in question to support older Windows versions, even down to Windows NT 4.0. Fortunately, that work has already been done for us, even if it’s not obvious at first. We won’t need to change a single line of libc++ code :)
When there is a Win32 threading implementation in libc++, and libc++ aims to be platform-agnostic, there must be implementations for other platforms too.
And checking include/__threading_support, there is not just one but two generic alternative implementations:
C11 and pthreads.
Well, the C11 implementation needs support from the C runtime library.
Even if Visual Studio’s C runtime library covered that, it would likely only do so for newer Windows versions.
But pthreads is an established POSIX standard for writing multiplatform threaded applications in C and C++.
Instead of dealing with the OS-specific threading API, you can just use the generic pthreads API for all your threading and synchronization needs.
At the end, you link your application to a pthreads implementation for the target operating system and that’s it.
Much like std::thread, but in C and two decades earlier.
In fact, pthreads has been so popular that there is not just one but two Windows implementations of it:
pthreads-win32 is the classic one started in 1998. That sounds just old enough for our desired Windows NT 4.0 support, which is why I tried it first. The devil is in the details though: The central
pthread_ttype of pthreads-win32 is a struct and not a simple scalar value. While this is perfectly fine according to the POSIX Threads and Single Unix specifications, the pthreads usage of libc++ assumes that pthread_t is a scalar which can be compared.winpthreads is a newer implementation by the Mingw-w64 project. It defines
pthread_tas a scalar and happily works down to Windows NT 4.0. With just a little patch from me (that is now upstream), it builds perfectly fine with Clang and Visual Studio’s C runtime library.
I created another Visual Studio project for winpthreads, added a few preprocessor definitions to build it warning-free, and added it as a dependency of libc++.
The already mentioned include\__config file of libc++ received an additional #define _LIBCPP_HAS_THREAD_API_PTHREAD line and that was it.
The combination of EnlyzeWinCompatLib, libc++, and winpthreads made it possible to build my software without depending on any API that is unavailable in Windows NT 4.0.
And as the icing on the cake, we can even drop the patch_exe_os_version.ps1 script from our build process.
Clang’s toolset has no arbitrary limitation on what you can set in Linker → System → Minimum Required Version.
Just enter 4.0 there and the built EXE file will be accepted by Windows NT 4.0.
The APIs that are different
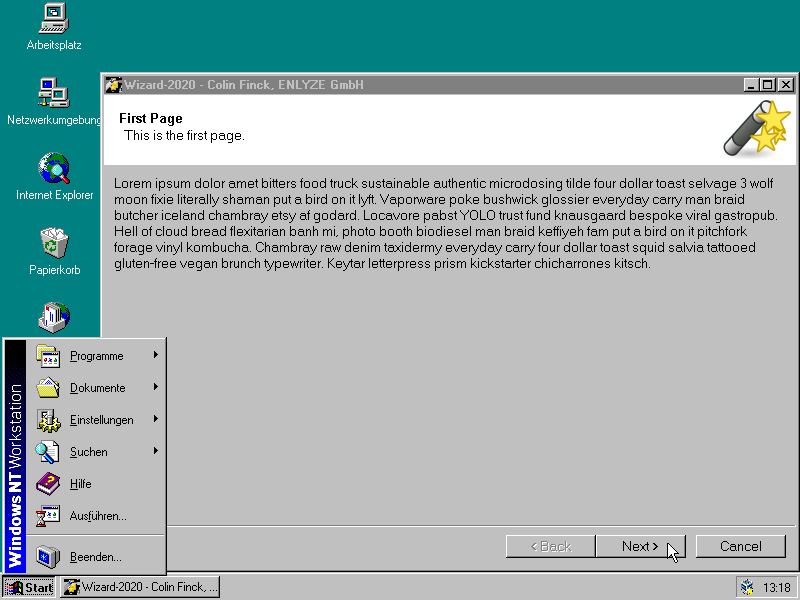
Being able to run your program under Windows NT 4.0 does not mean that everything works just yet:
When trying to run the Clang-compiled Wizard-2020 example, it shows up and the buttons do what they should, but all captions are missing.
A few debugging rounds later, it turns out that my implementation of LoadStringAsWstr is the culprit.
It looks like Windows NT 4’s LoadStringW API simply does not implement the safe way of retrieving a read-only pointer to a string resource.
A quick look into an old Win32 Programmer’s Reference confirms that.
I’ve propagated this alternative way of using LoadStringW in one of my previous blog posts and wondered why it’s still uncommon in example code. Now I understand.
Being only left with the standard way of using LoadStringW, I entirely gave up on that API.
I cannot know beforehand if my resource string is 10 bytes, 1000 bytes, or even more, and I don’t want to define a maximum and always allocate that size.
So what’s an alternative way to get a read-only pointer to that string?
This journey again got me deeper into Windows internals than I expected.
As it turns out, LoadStringW does more under the hood than any other API for loading resources.
String resource IDs can’t be accessed directly, but they are grouped into blocks of 16 strings and stored under their block ID.
Each string is preceded by its length.
You first need to find the block via its ID, get a pointer to its bytes, and skip each previous string in the block via its length until you reach the string you are looking for.
You then have a read-only pointer to the string and also its length, which can be fed into an std::wstring.
A more detailed explanation is beyond the scope of this post, so I refer you to my commented implementation of LoadStringAsWstr for Windows NT 4.
Keep this story in mind when testing your application on older Windows versions.
Whereas Windows 2000 was not that different from XP and later iterations of the Win32 API, this is not so true for anything older.
Things we take for granted today - like Plug & Play, power management, or a general idea of security - have only been introduced in Windows 2000.
The reward for all the work
Finally, after the last fix, our Wizard-2020 demo application appears in its full glory under Windows NT 4:
Conclusion
Windows NT 4.0 is old, very old, and I can only stress again that I wouldn’t have gone this far if it wasn’t for a customer.
But now I’m happy to have discovered the Clang toolset of Visual Studio 2019, and being able to build software not just for ancient Windows versions, but also against a C++ standard library that I can trust.
Enjoy C++20 and further evolutions of the standard on 25 years of Microsoft operating systems.
My methods may not be as impressive as C# on Windows 3.11 (kudos to that).
But they should be of more practical use and scale to bigger projects.
You can get the updated Wizard-2020 example on GitHub as well as my adapted EnlyzeWinCompatLib (which includes libc++ and winpthreads via submodules).
As we saw, Clang support in Visual Studio is still in its infancy and has some quirks here and there.
I’d be interested to hear from your experience of using Clang in Visual Studio.
My use case is certainly not what Microsoft had in mind when they added the Clang toolset to Visual Studio :)
Colin Finck is working as a Software Engineer at ENLYZE. He has been digging into Windows internals for over a decade as a core member of the ReactOS Project.